
The Golf Course
Family Owned Since 2012
Quick Facts
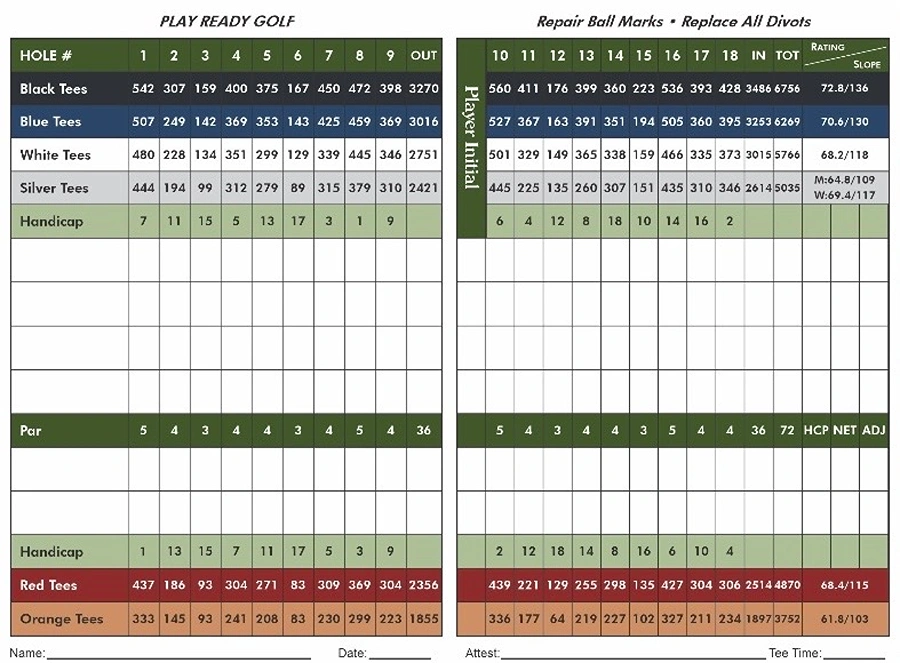
- Par 72
- 18 Holes
- 6 Sets of Tees (3,752–6,756 yards)
- Signature Hole: #8
- Best Birdie Opportunities: #2, #14 & #16
Greenfield Course Guide
Course Overview
Every hole at Greenfield Plantation has its own personality, rewarding smart decisions, confident swings, and thoughtful course management. Whether you’re visiting for the first time or have played Greenfield for years, this hole-by-hole guide shares local insight to help you navigate each hole, avoid common mistakes, and uncover scoring opportunities throughout your round.
With six sets of tees ranging from 3,752 to 6,756 yards, Greenfield offers an enjoyable challenge for golfers of every skill level. From the welcoming opening hole to the demanding finishing stretch, you’ll find that patience, positioning, and a well-executed game plan are often rewarded more than raw power.
Enjoy your round, trust your strategy, and discover why so many golfers call Greenfield Plantation one of Bradenton’s favorite places to play.
HOLE-BY-HOLE GUIDE
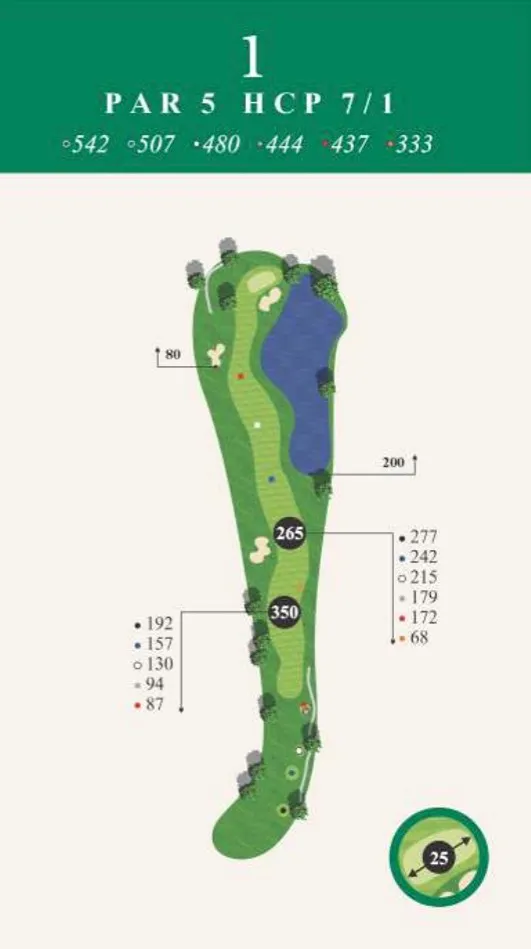
Hole 1 | Par 5
A welcoming opening hole that rewards smart course management. Favor the left side of the fairway off the tee to set up the best angle into the green while avoiding the water and bunkers protecting the right side.
Opening Strategy: A drive down the left takes much of the trouble out of your layup or approach and sets the tone for a confident start.
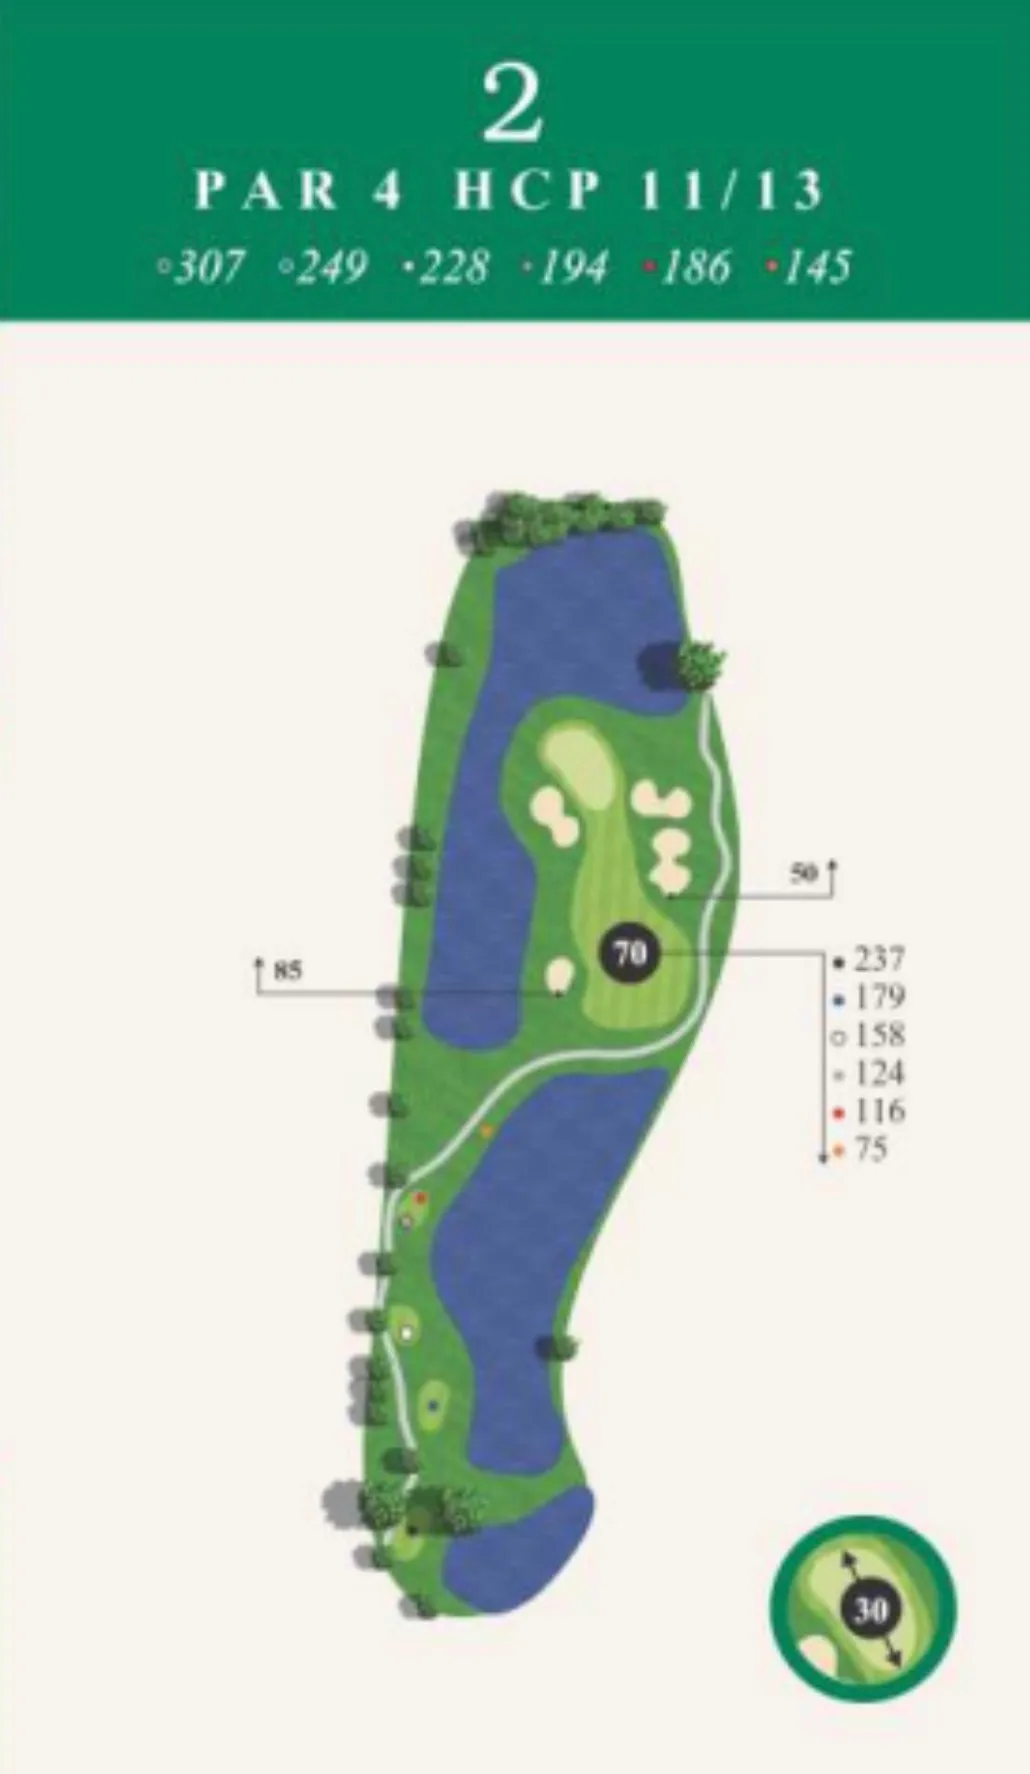
Hole 2 | Par 4
This short par 4 tempts longer hitters to go for the green, but the smarter play is often a fairway wood or hybrid into the fairway. Water guards the left, bunkers protect the right, and a simple wedge approach can lead to a great scoring opportunity.
Local Knowledge: Just because you can go for the green doesn’t always mean you should. A well-placed layup often leads to the easiest birdie chance.
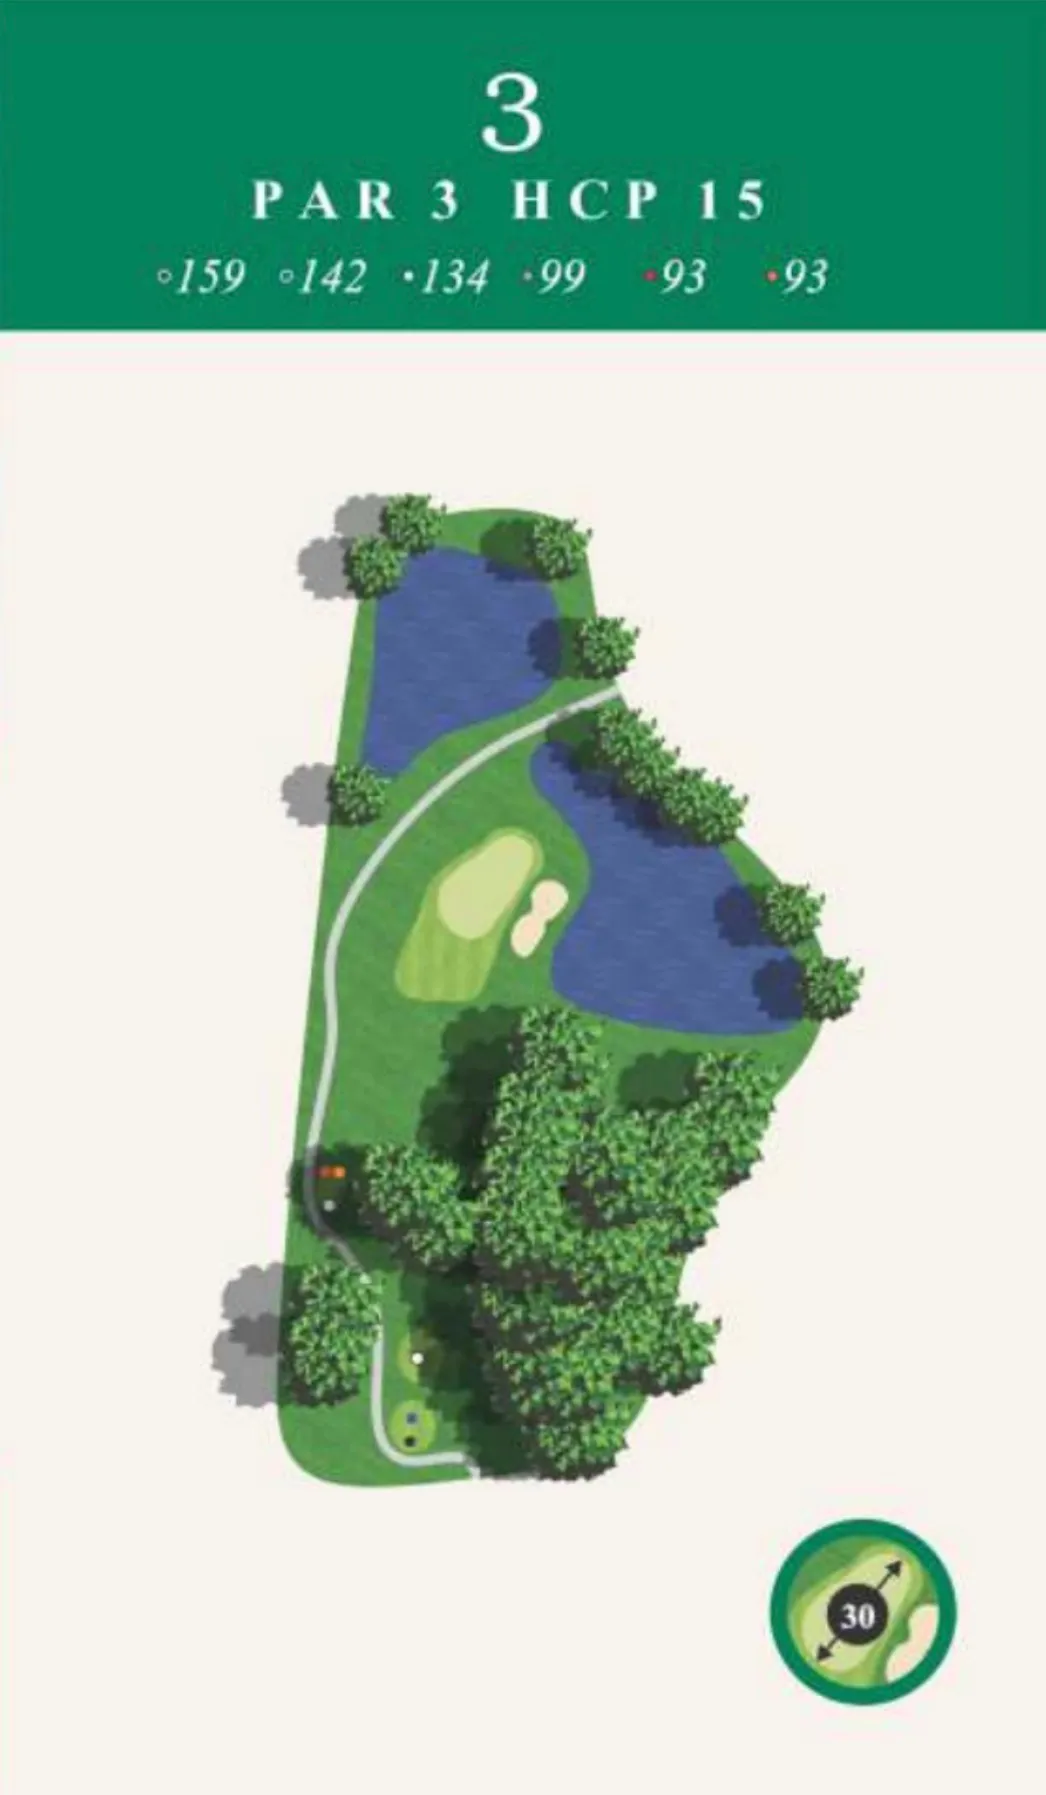
Hole 3 | Par 3
A short par 3 that rewards confidence and solid distance control. Water and a bunker guard the right side of the green, while another lake waits behind for shots that carry too far.
Distance Control: Play toward the widest part of the green and let the putter do the work.
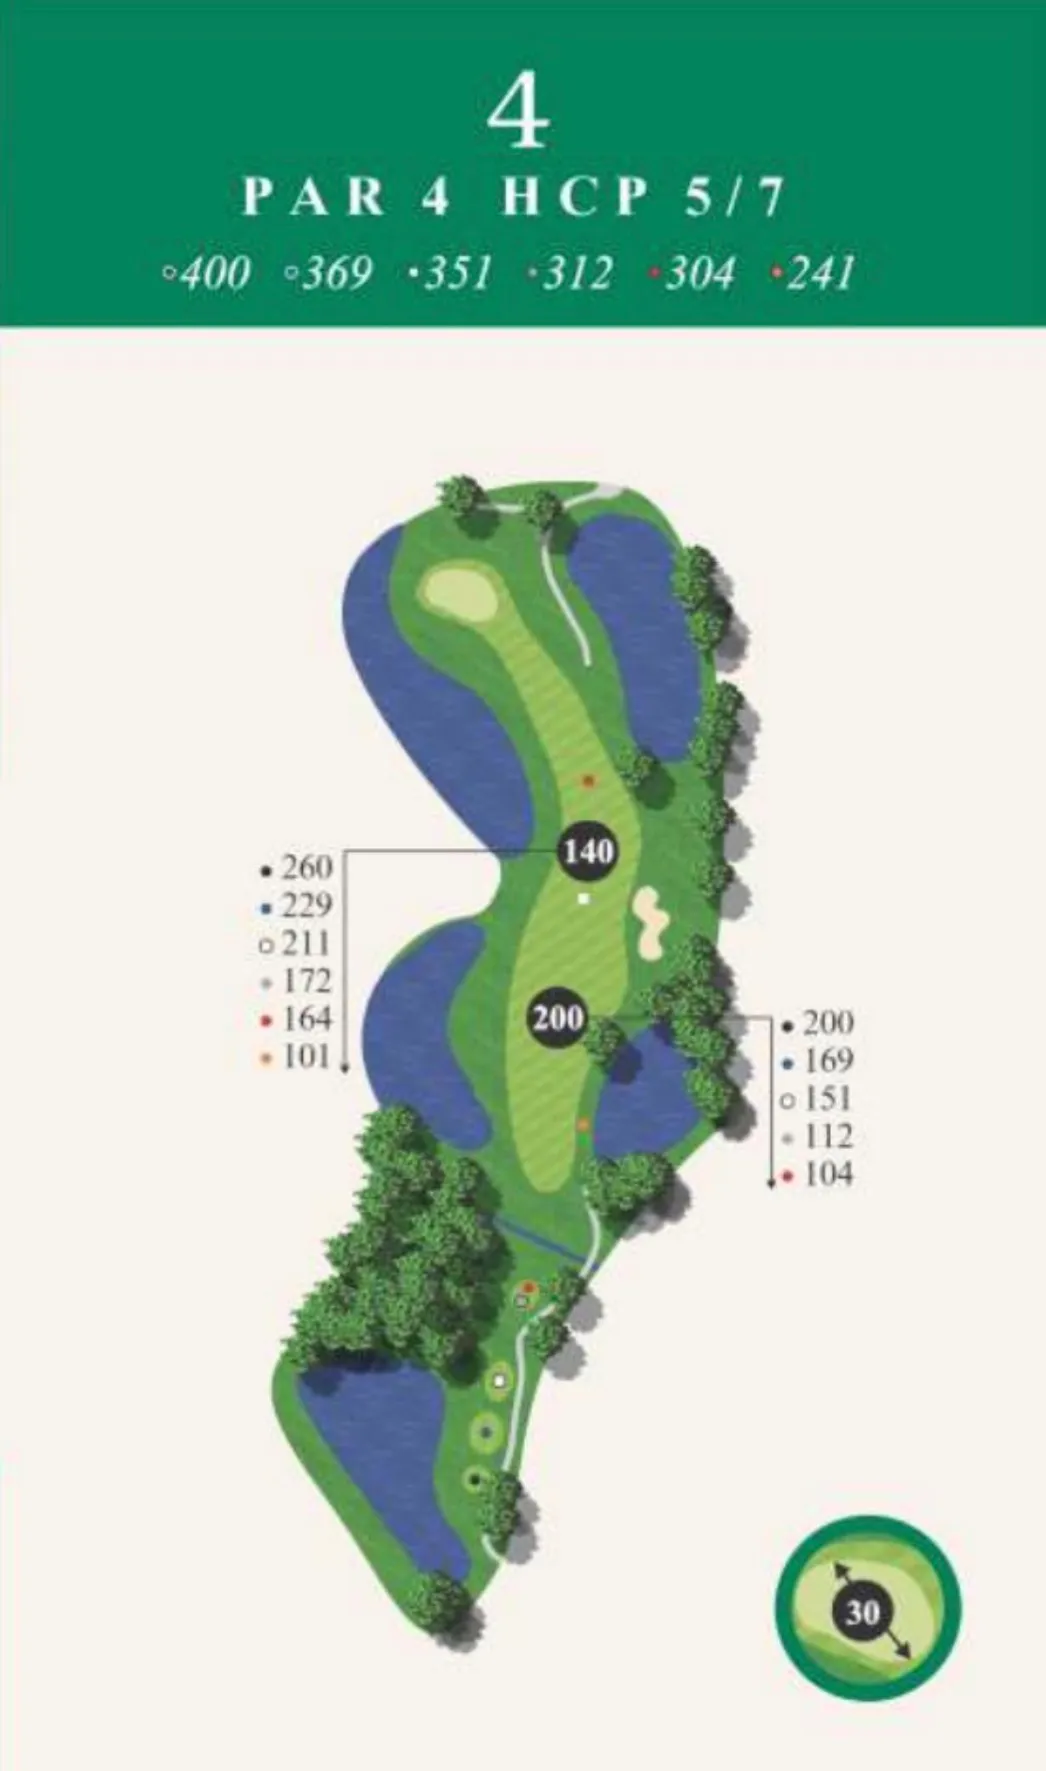
Hole 4 | Par 4
Accuracy is the priority on this demanding dogleg-left par 4. Lakes frame both sides of the fairway, while water remains in play around the green, rewarding two well-executed shots.
Strategy: Find the fairway first, trust your yardage, and commit to your target. Par is a solid score here.
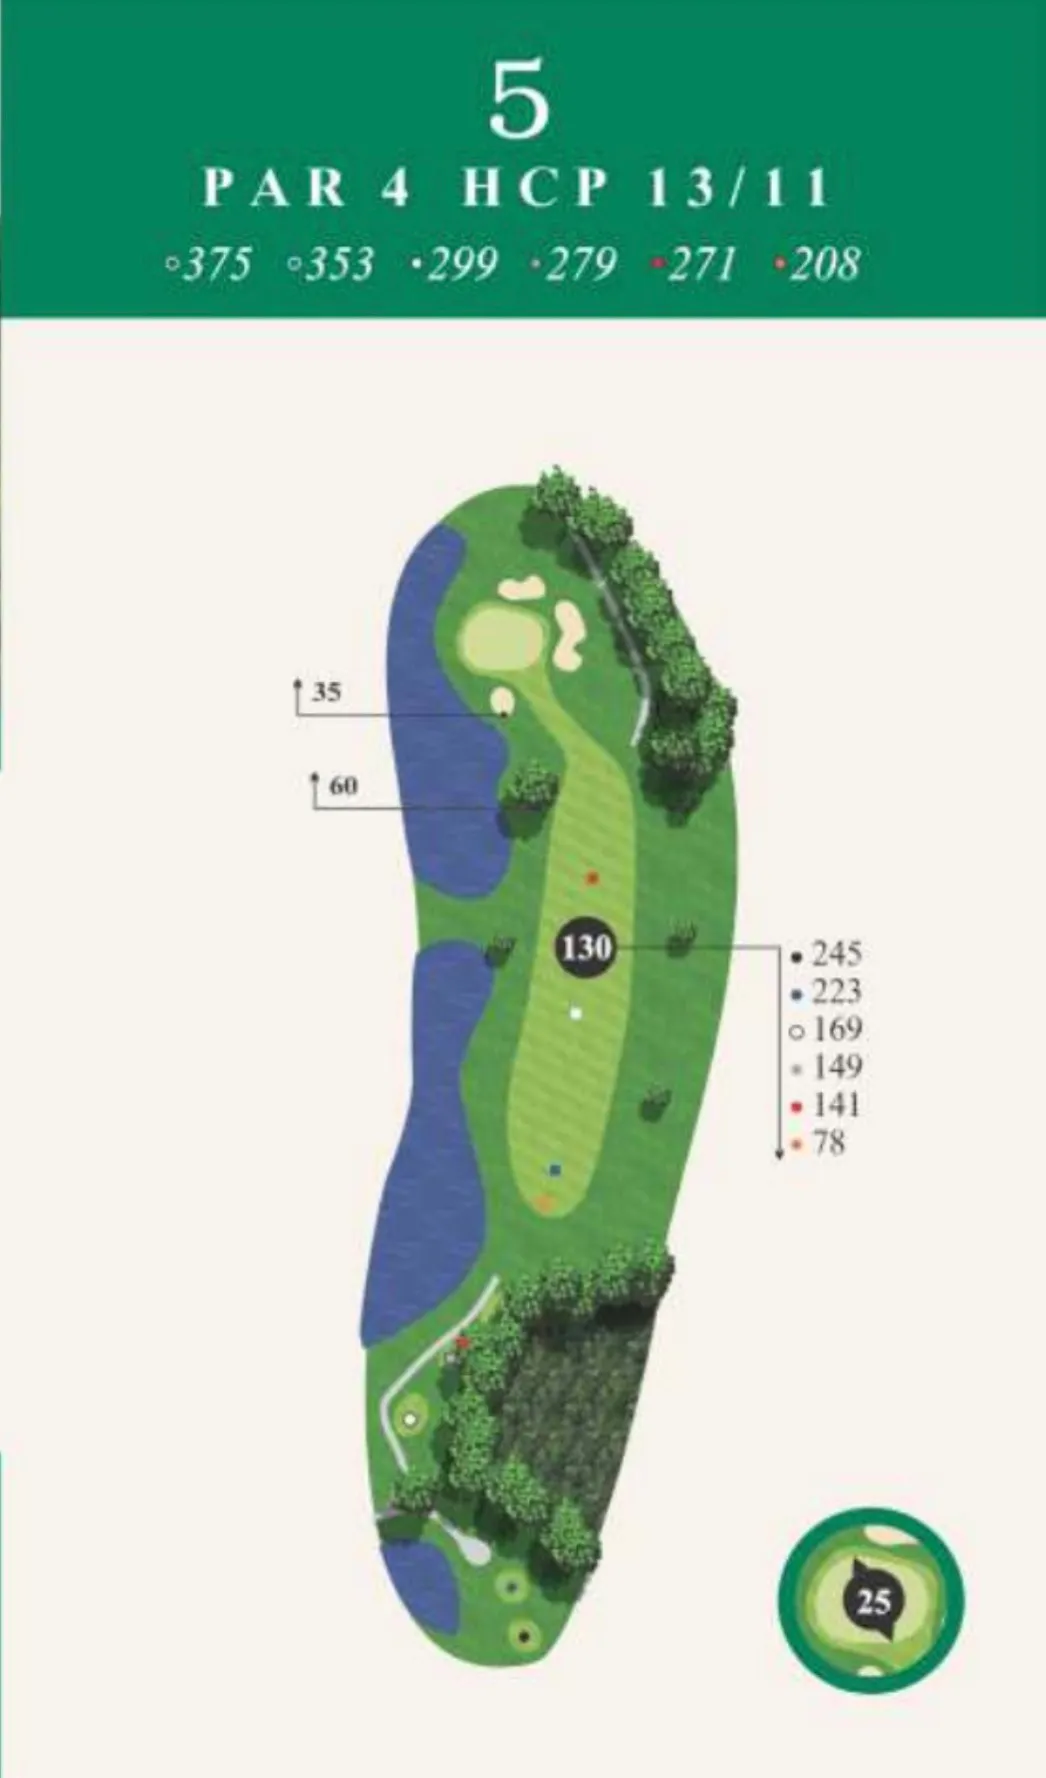
Hole 5 | Par 4
A shorter par 4 that rewards position over power. The fairway bends left immediately, making a controlled tee shot the ideal play. Water guards the left side, while trees and rough await anything pushed right.
Play Smart: A drive in the fairway leaves a comfortable approach. Trust a smooth swing and carry the greenside bunkers.
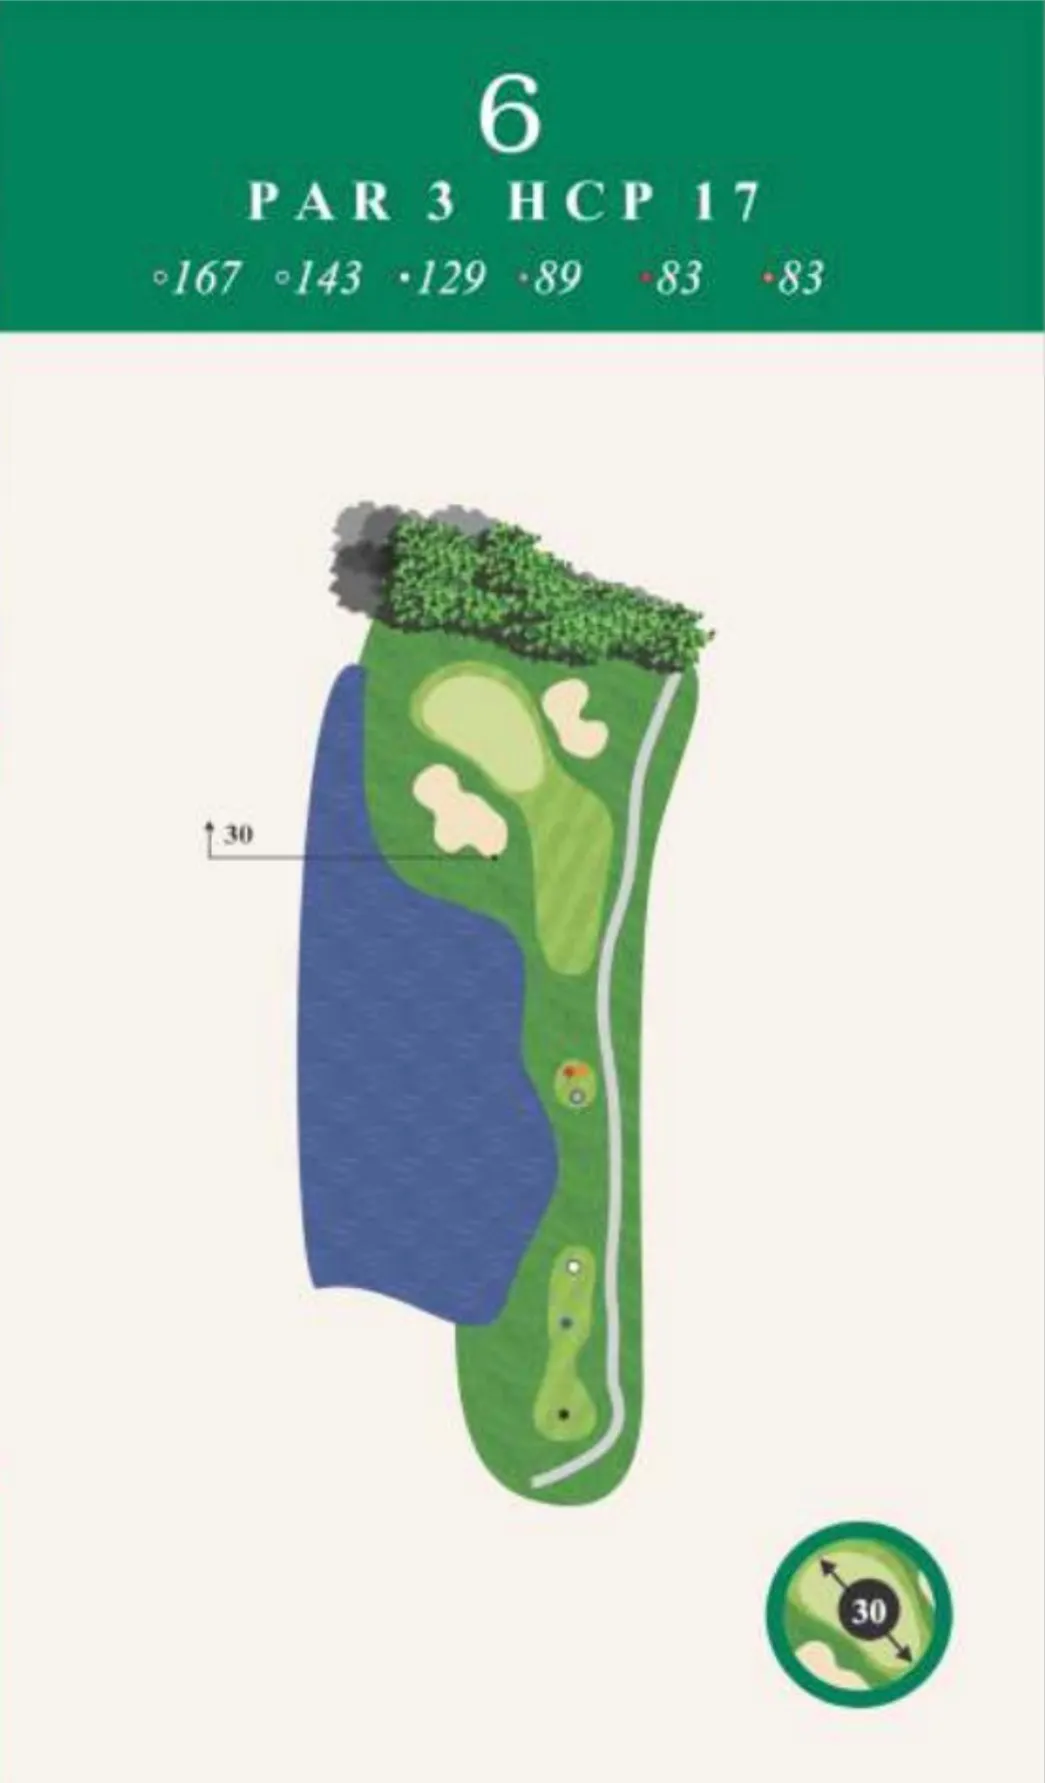
Hole 6 | Par 3
A straightforward par 3 where distance control is everything. The green slopes from back to front and is protected by bunkers on the front left and back right.
Trust Your Number: Favor the safe side of the green. Missing long brings the woods into play, while anything left can find the water.
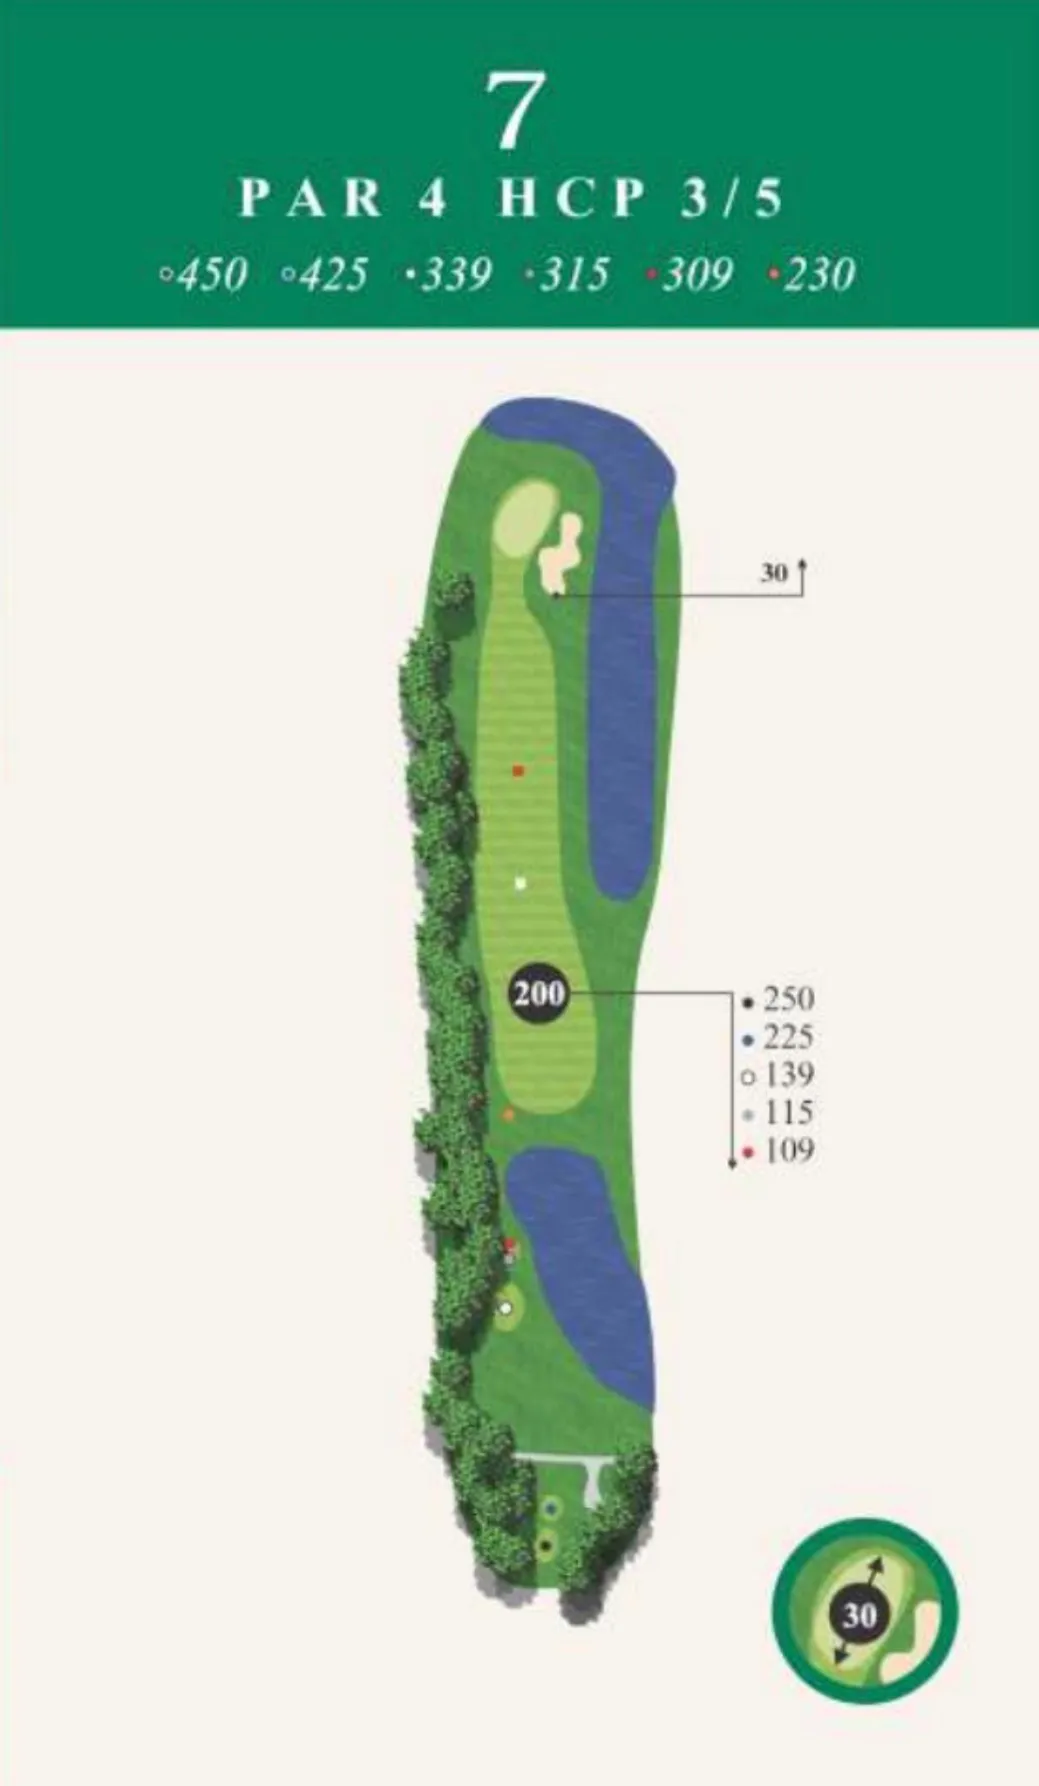
Hole 7 | Par 4
One of the course’s toughest par 4s, this hole demands both distance and accuracy. Championship tees require a carry over water, while water right and woods left leave little room for error.
Avoid Trouble: Favor the left side of the green on your approach to stay clear of the bunker and water guarding the right. Walking away with par is a great result.
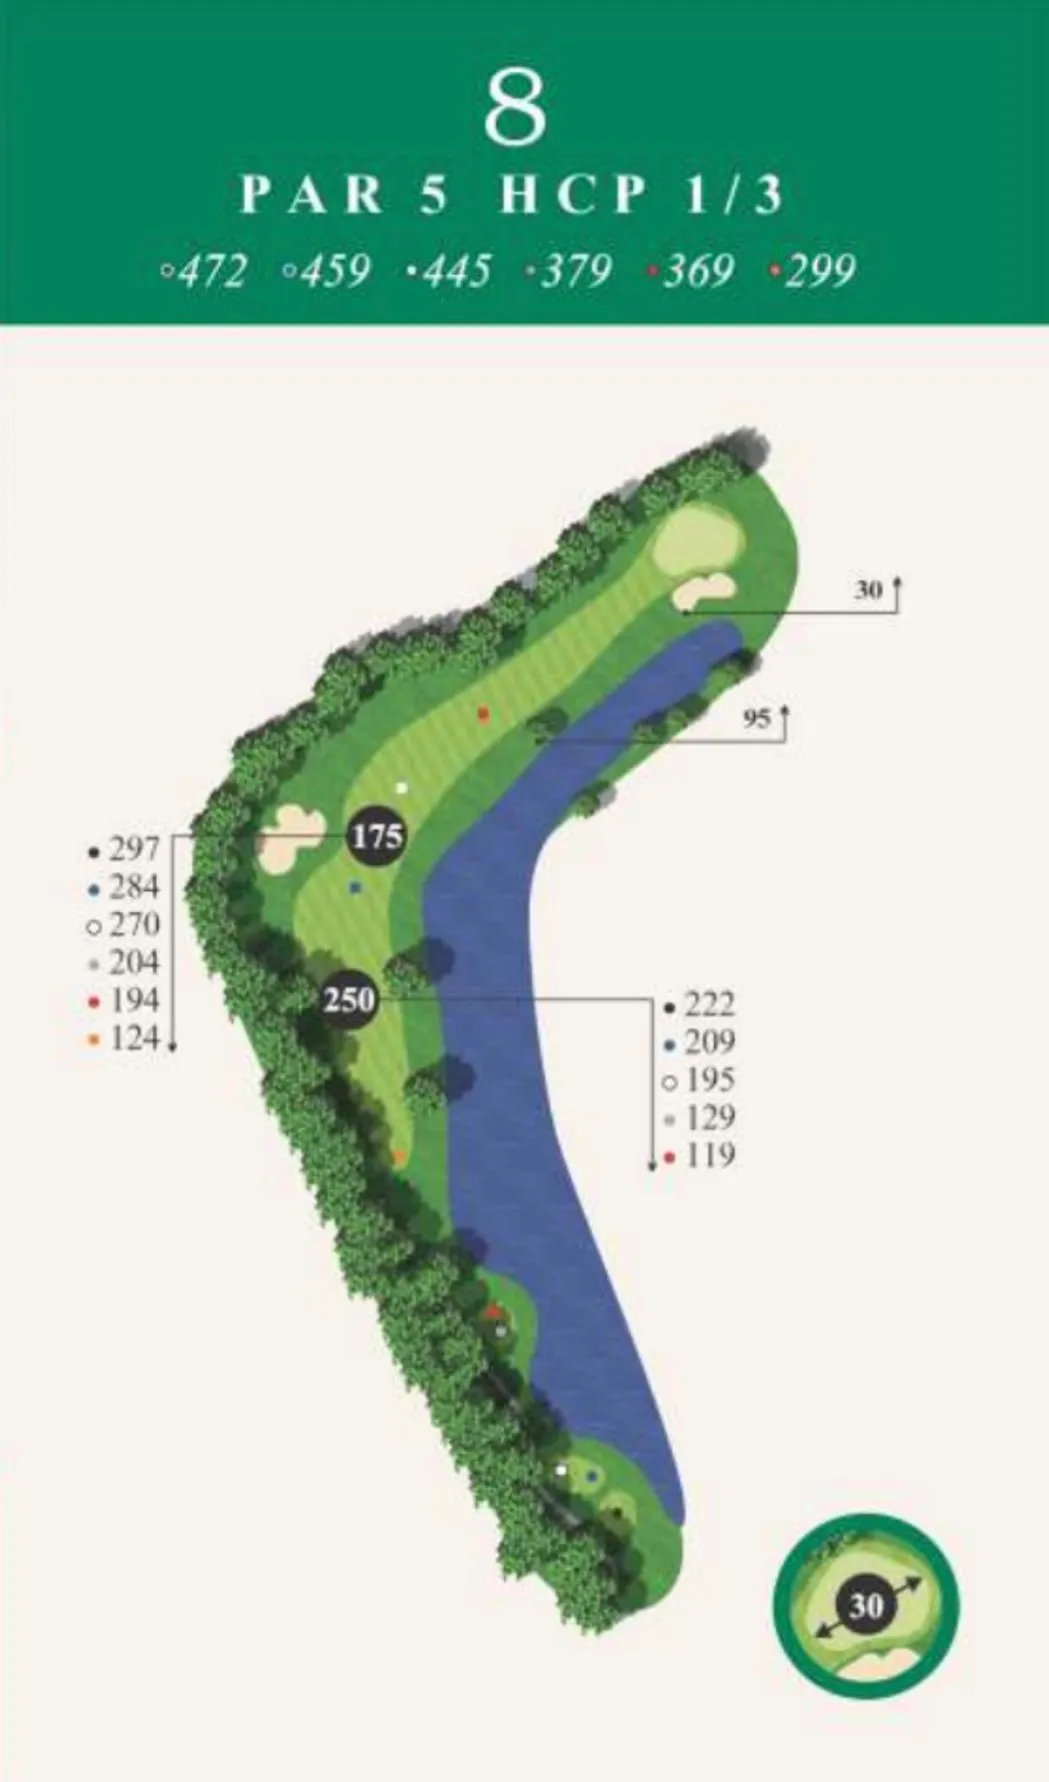
Hole 8 | Signature Hole | Par 5
The signature hole at Greenfield is a short but demanding par 5 where strategy outweighs distance. A sharp dogleg right, water stretching the entire right side, and woods lining the left create a true risk-versus-reward challenge.
Risk vs. Reward: A conservative tee shot short of the fairway bunker sets up an ideal layup. Long hitters can cut the corner and reach in two, but one aggressive swing can quickly turn birdie into bogey—or worse.
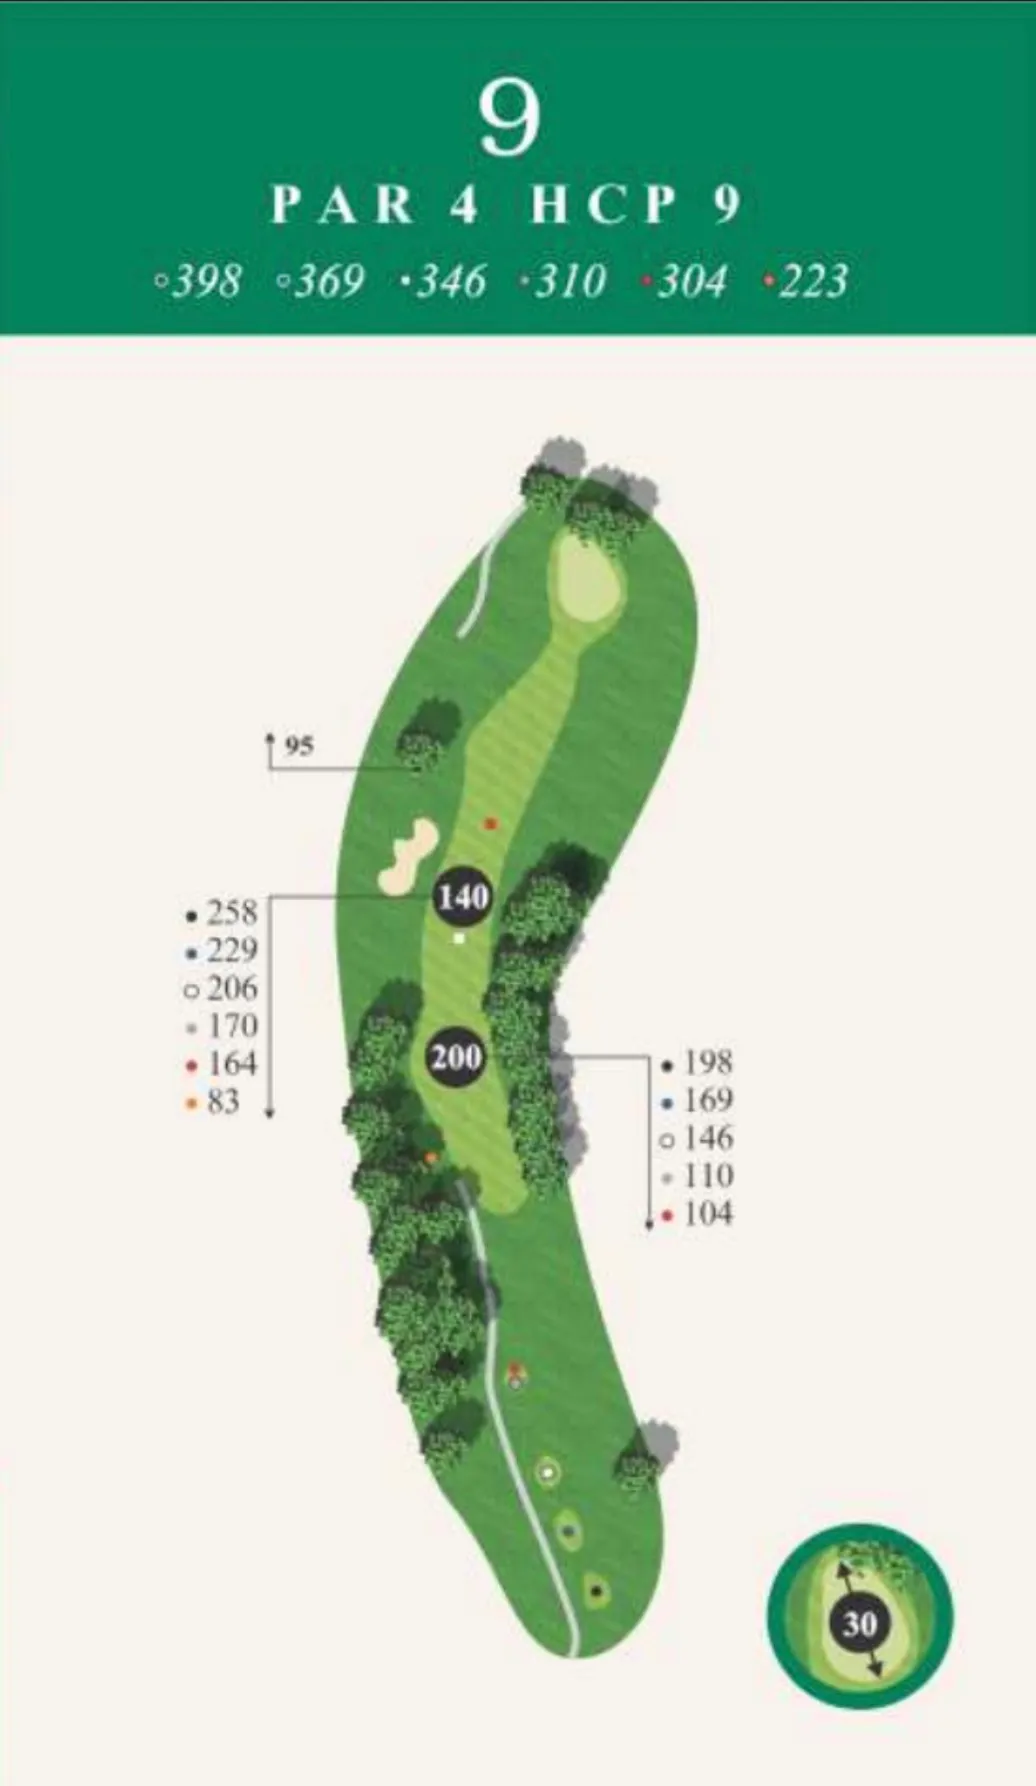
Hole 9 | Par 4
A dogleg-right par 4 that rewards a well-placed tee shot to finish the front nine. Aim between the trees on the right and the fairway bunker on the left to set up the best angle into the green. The approach often plays about half a club longer than the yardage suggests.
Finish Strong: Commit to your line off the tee, trust your yardage into the green, and finish the front nine with confidence.
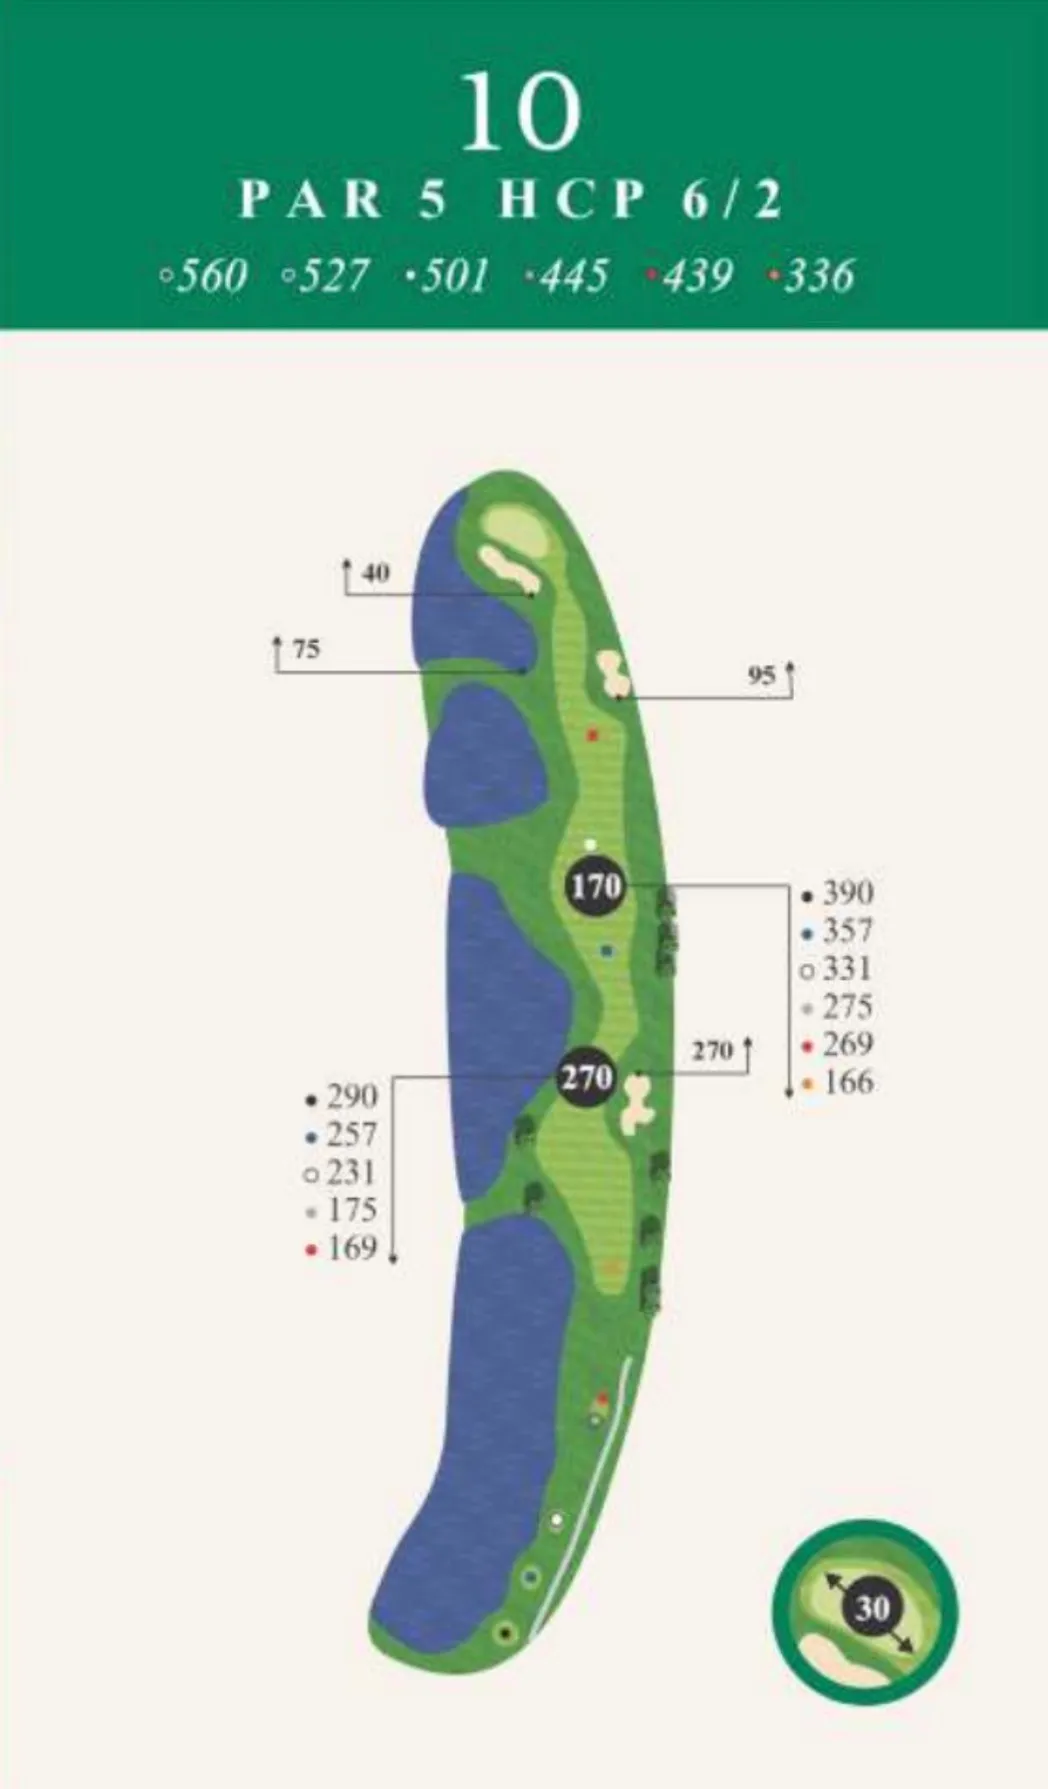
Hole 10 | Par 5
The back nine begins with a demanding par 5 featuring water stretching the entire left side from tee to green. Favor the right side of the fairway to keep the hazard out of play and set up your next shot. A deep bunker protects the left side of the green.
Position is Everything: The green runs away from the approach, so don’t leave yourself short. Commit to your yardage and let the hole come to you.
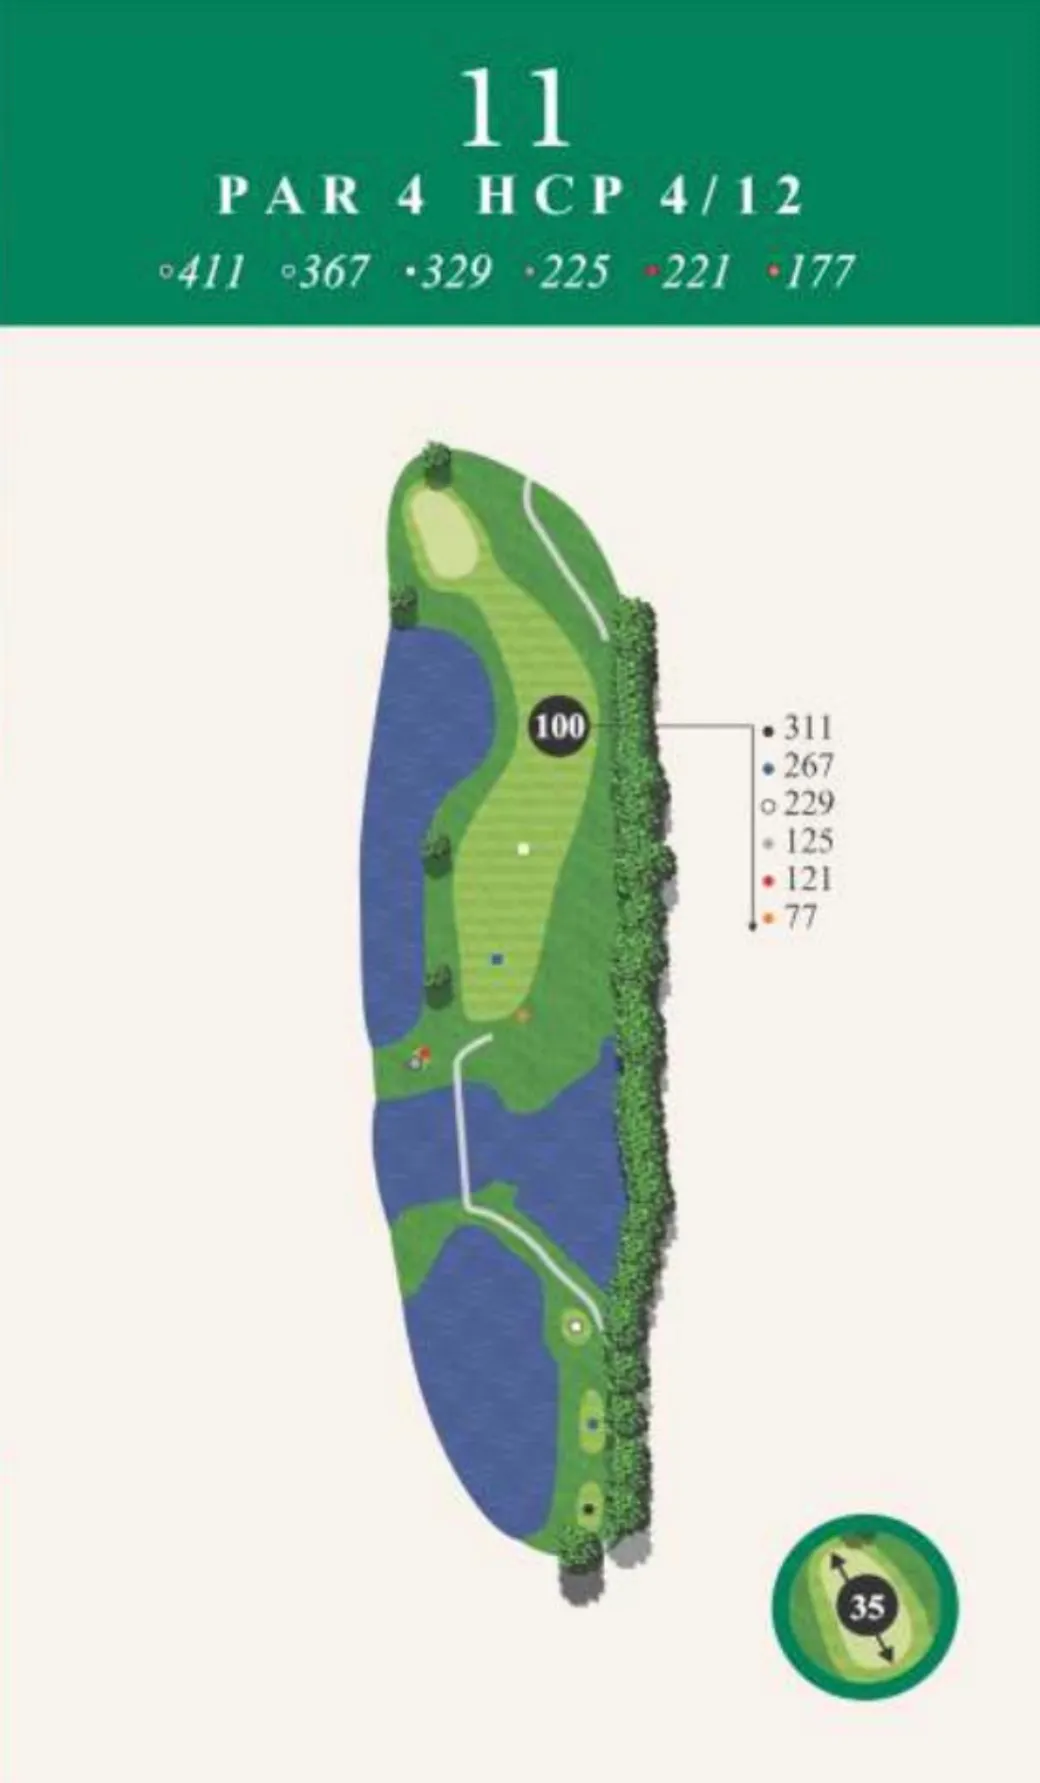
Hole 11 | Par 4
Arguably the toughest tee shot on the course, this par 4 begins with a carry over wetlands before narrowing between water on the left and trees on the right. A drive into the center of the fairway creates the best opportunity to attack the elevated green.
Tee Shot Matters: Accuracy comes first. Find the fairway, trust your distance into the green, and let par come naturally.
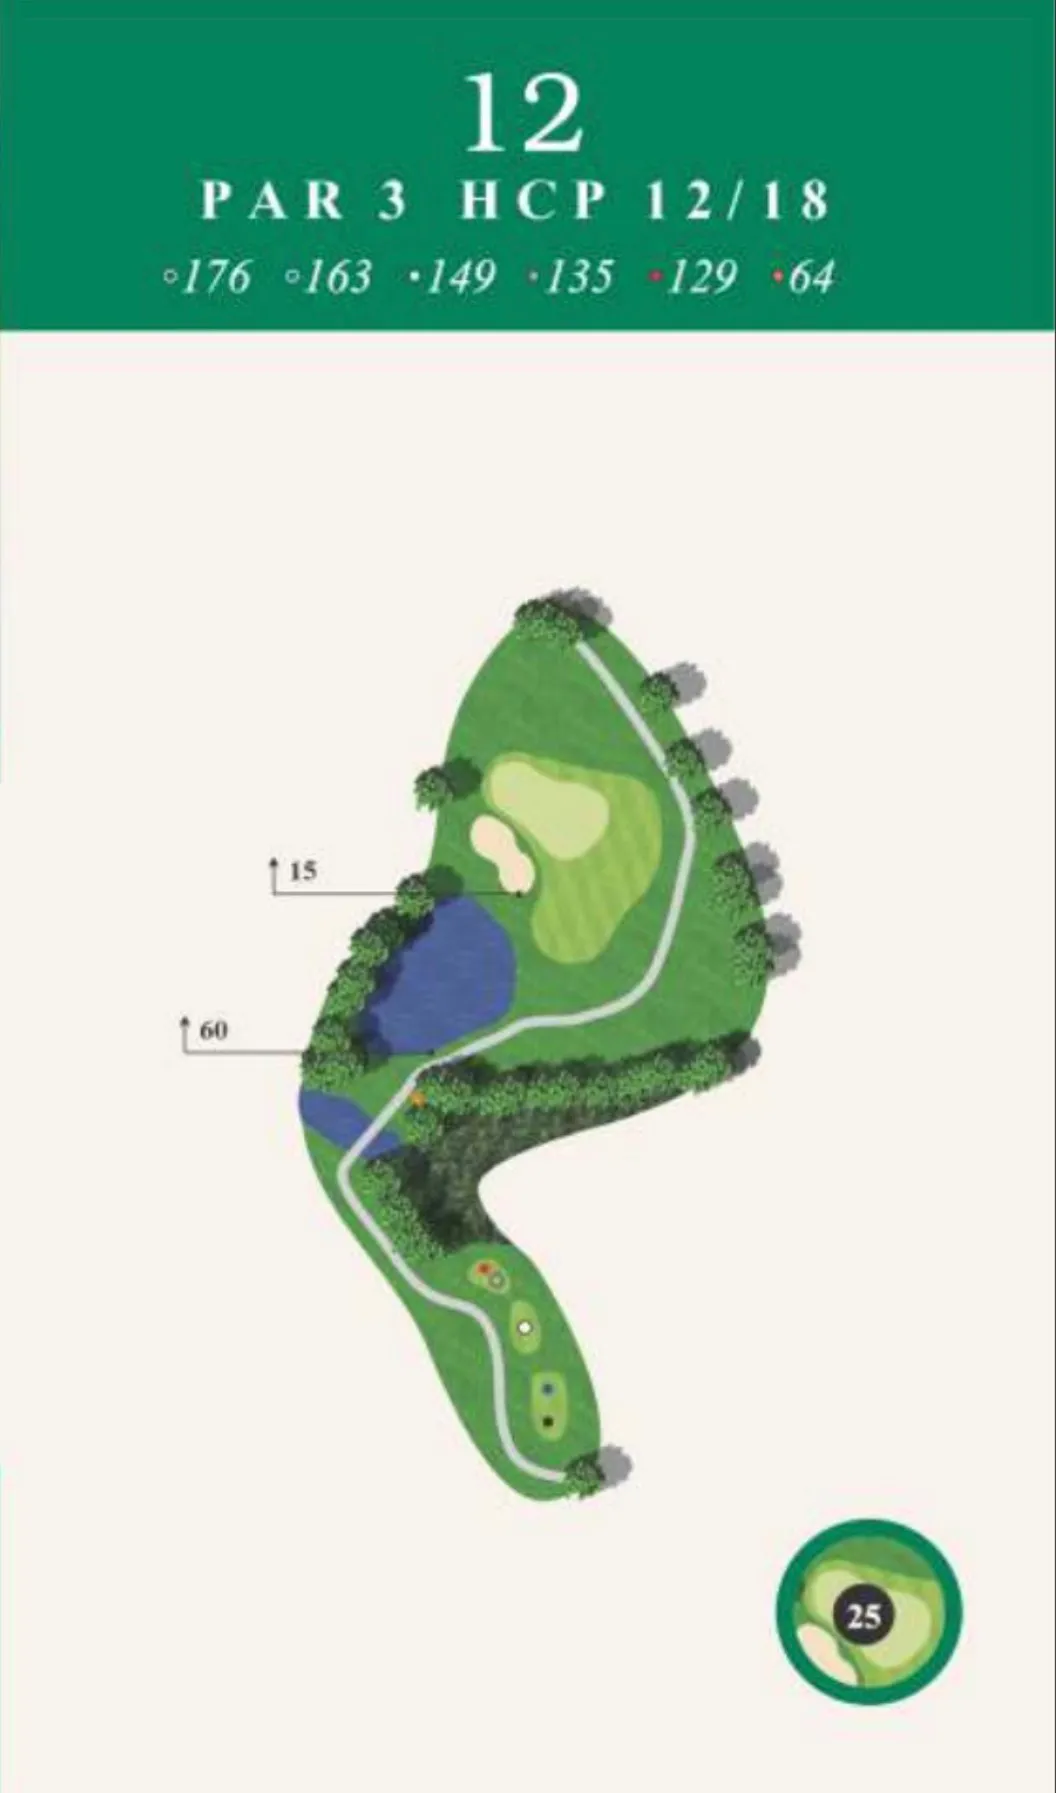
Hole 12 | Par 3
A solid par 3 where commitment is everything. Carry the wetlands confidently while avoiding the lake on the left. The green slopes from back to front, making distance control especially important.
Commit to the Swing: Choose your club with confidence and favor the safe side of the green. Leaving yourself an uphill putt is far easier than recovering from the surrounding hazards.
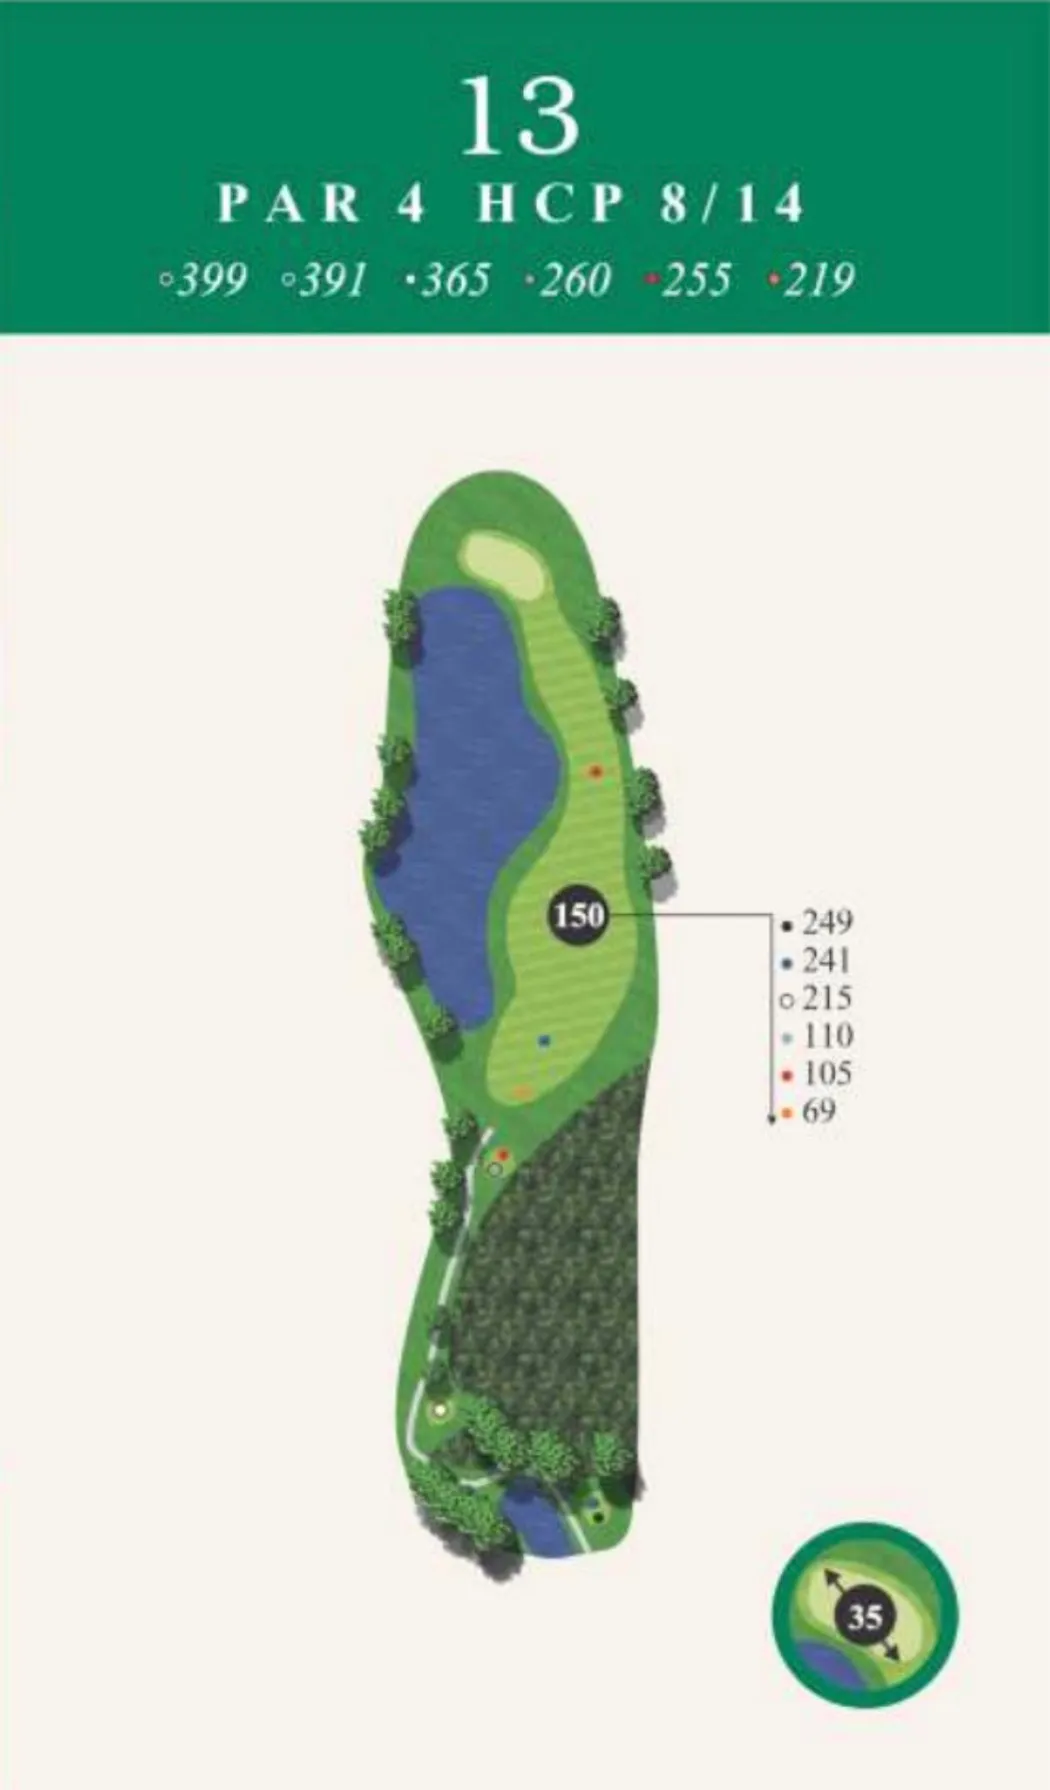
Hole 13 | Par 4
Players on the back tees begin with a carry over wetlands before finding a generous landing area. Water hugs the entire left side from fairway to green, while the angled putting surface rewards a drive positioned in the middle of the fairway.
Course Tip: Trust your yardage into the green. Shots left, or those coming up short, can quickly bring the water into play.
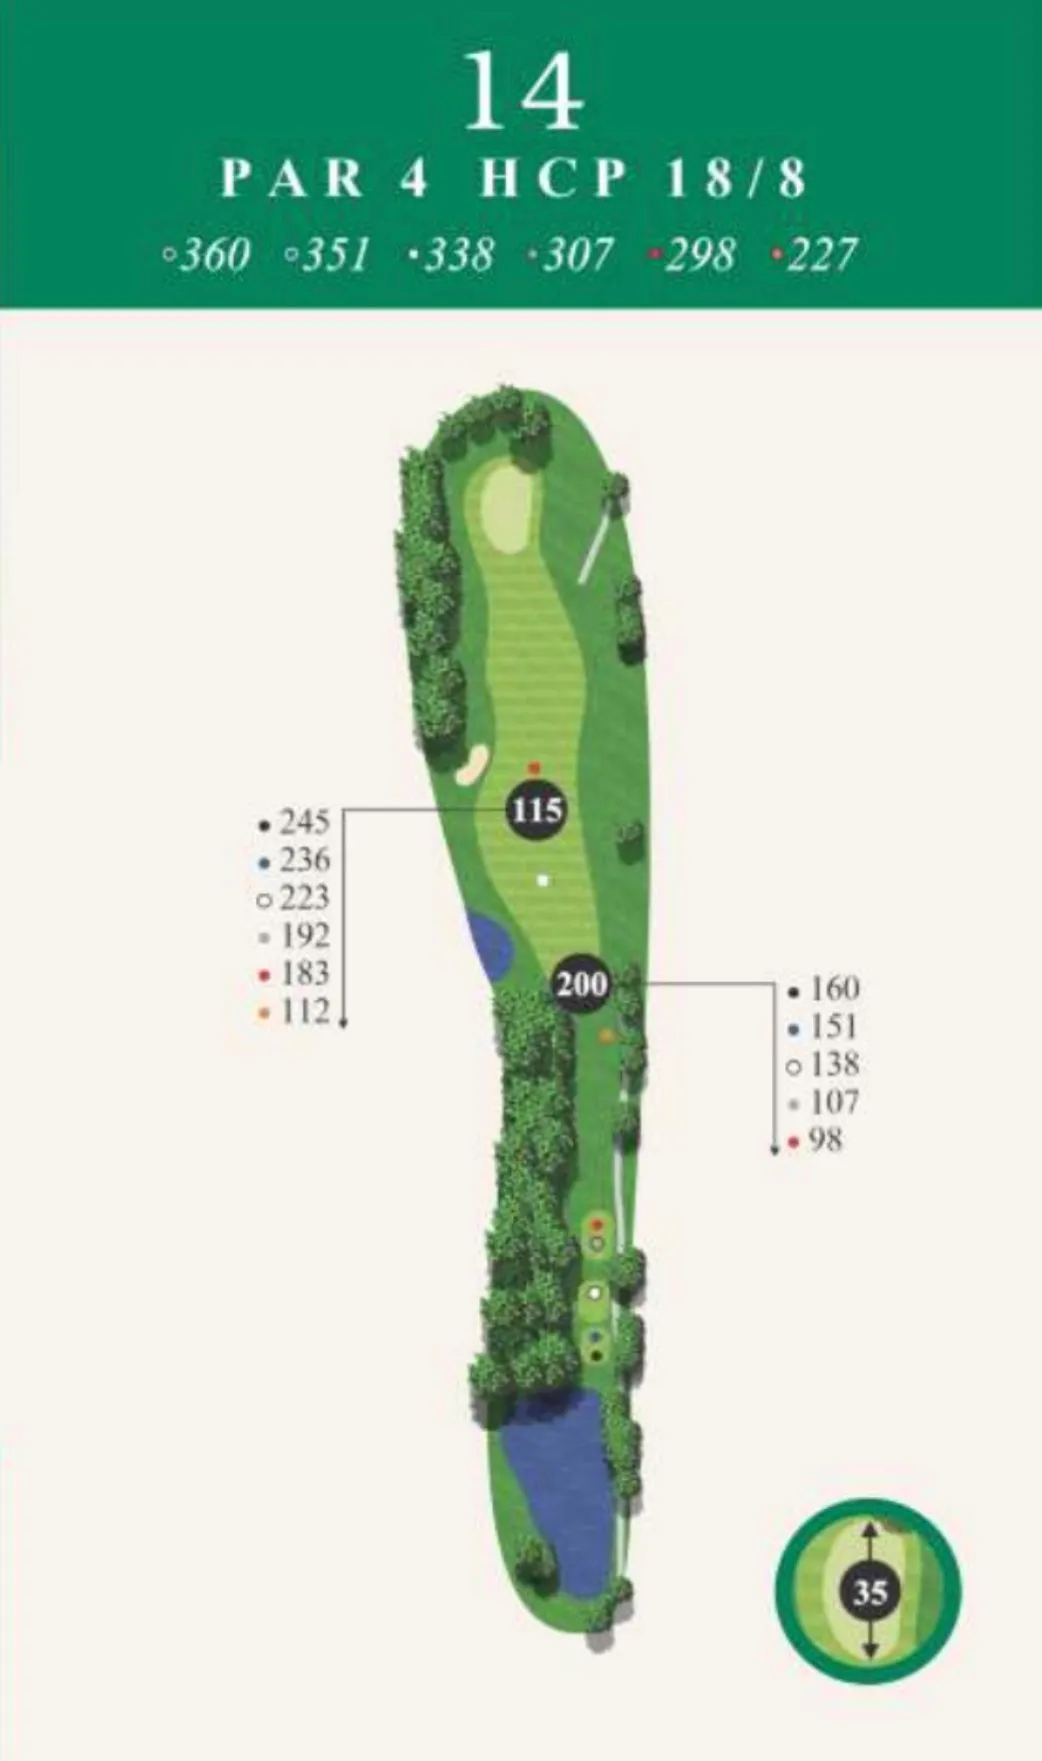
Hole 14 | Par 4
One of the best scoring opportunities on the back nine, this short par 4 rewards confidence from the tee. Favor the left side of the fairway to open the best angle into the green while staying comfortably away from the road on the right.
Birdie Opportunity: A quality tee shot does most of the work here. Stay aggressive with a wedge in hand and take advantage of the chance to score.
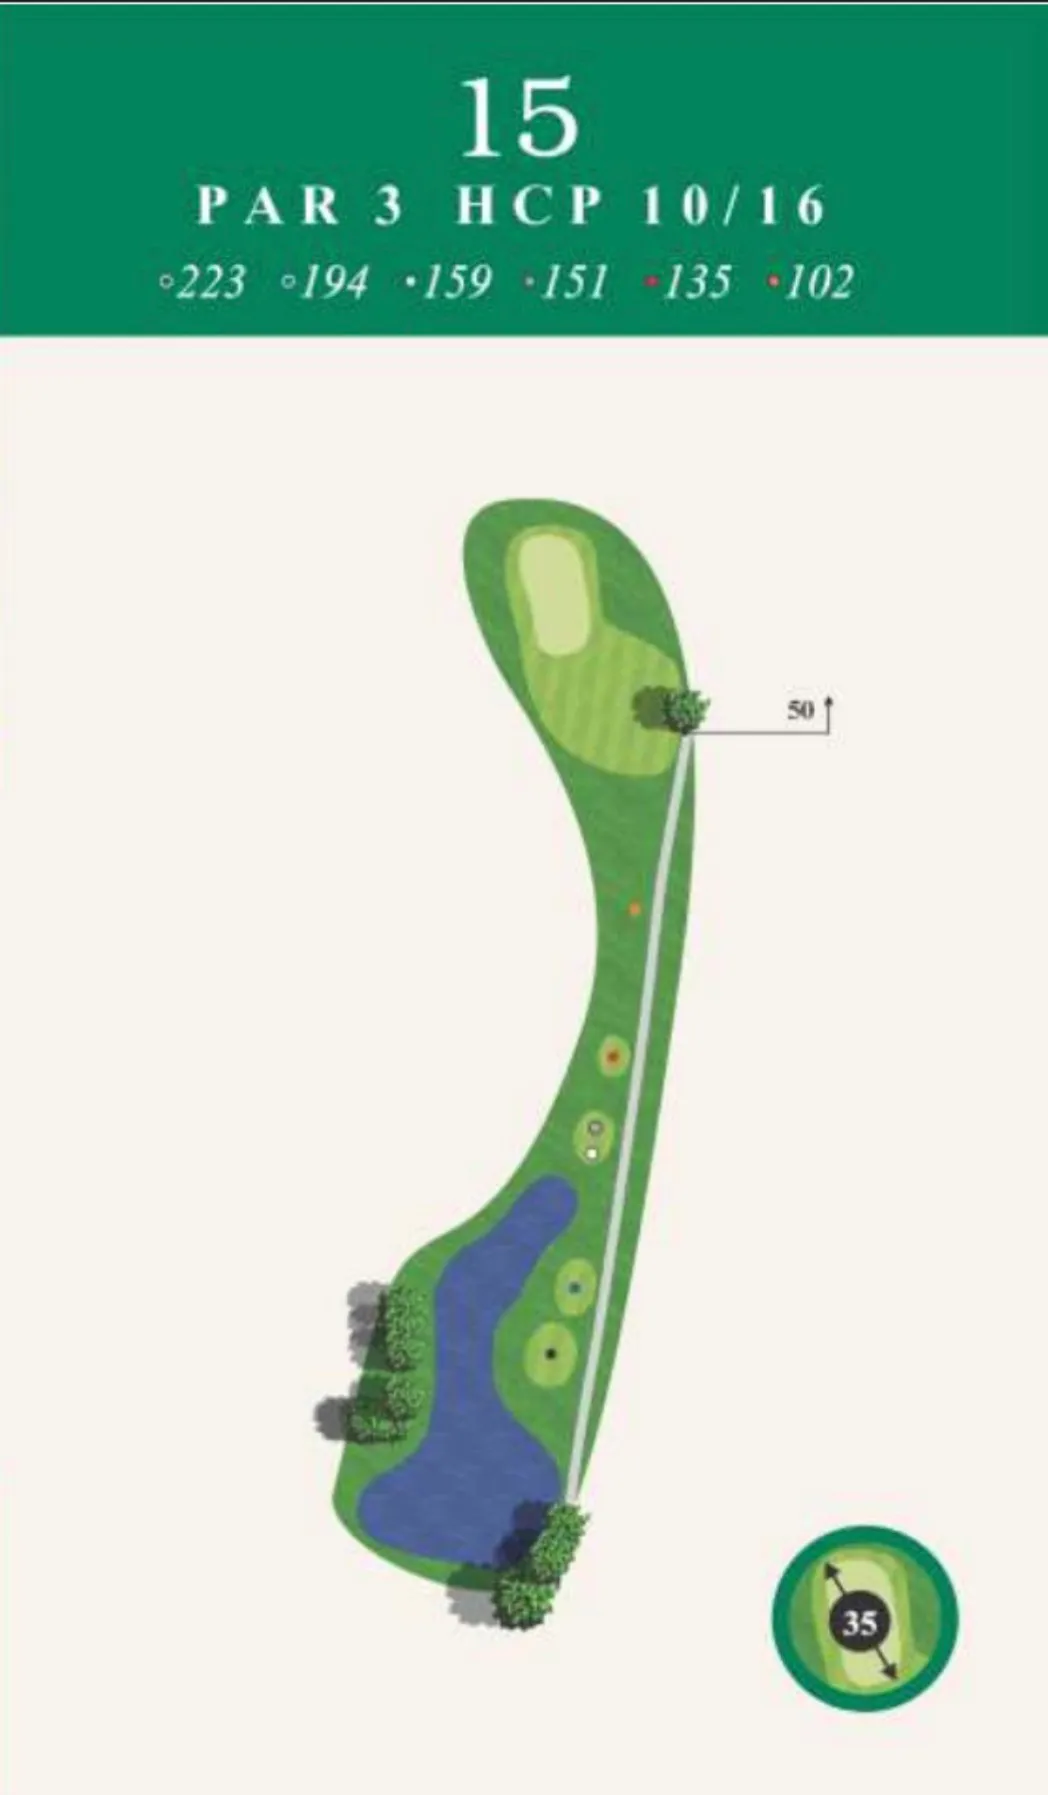
Hole 15 | Par 3
Widely regarded as the course’s toughest par 3, this demanding hole features a long, narrow green that slopes sharply from back to front. Even well-struck shots often leave testing putts.
Accept Your Par: Play toward the widest section of the green and resist chasing difficult pin locations. Walking away with par feels like gaining a stroke on the field.
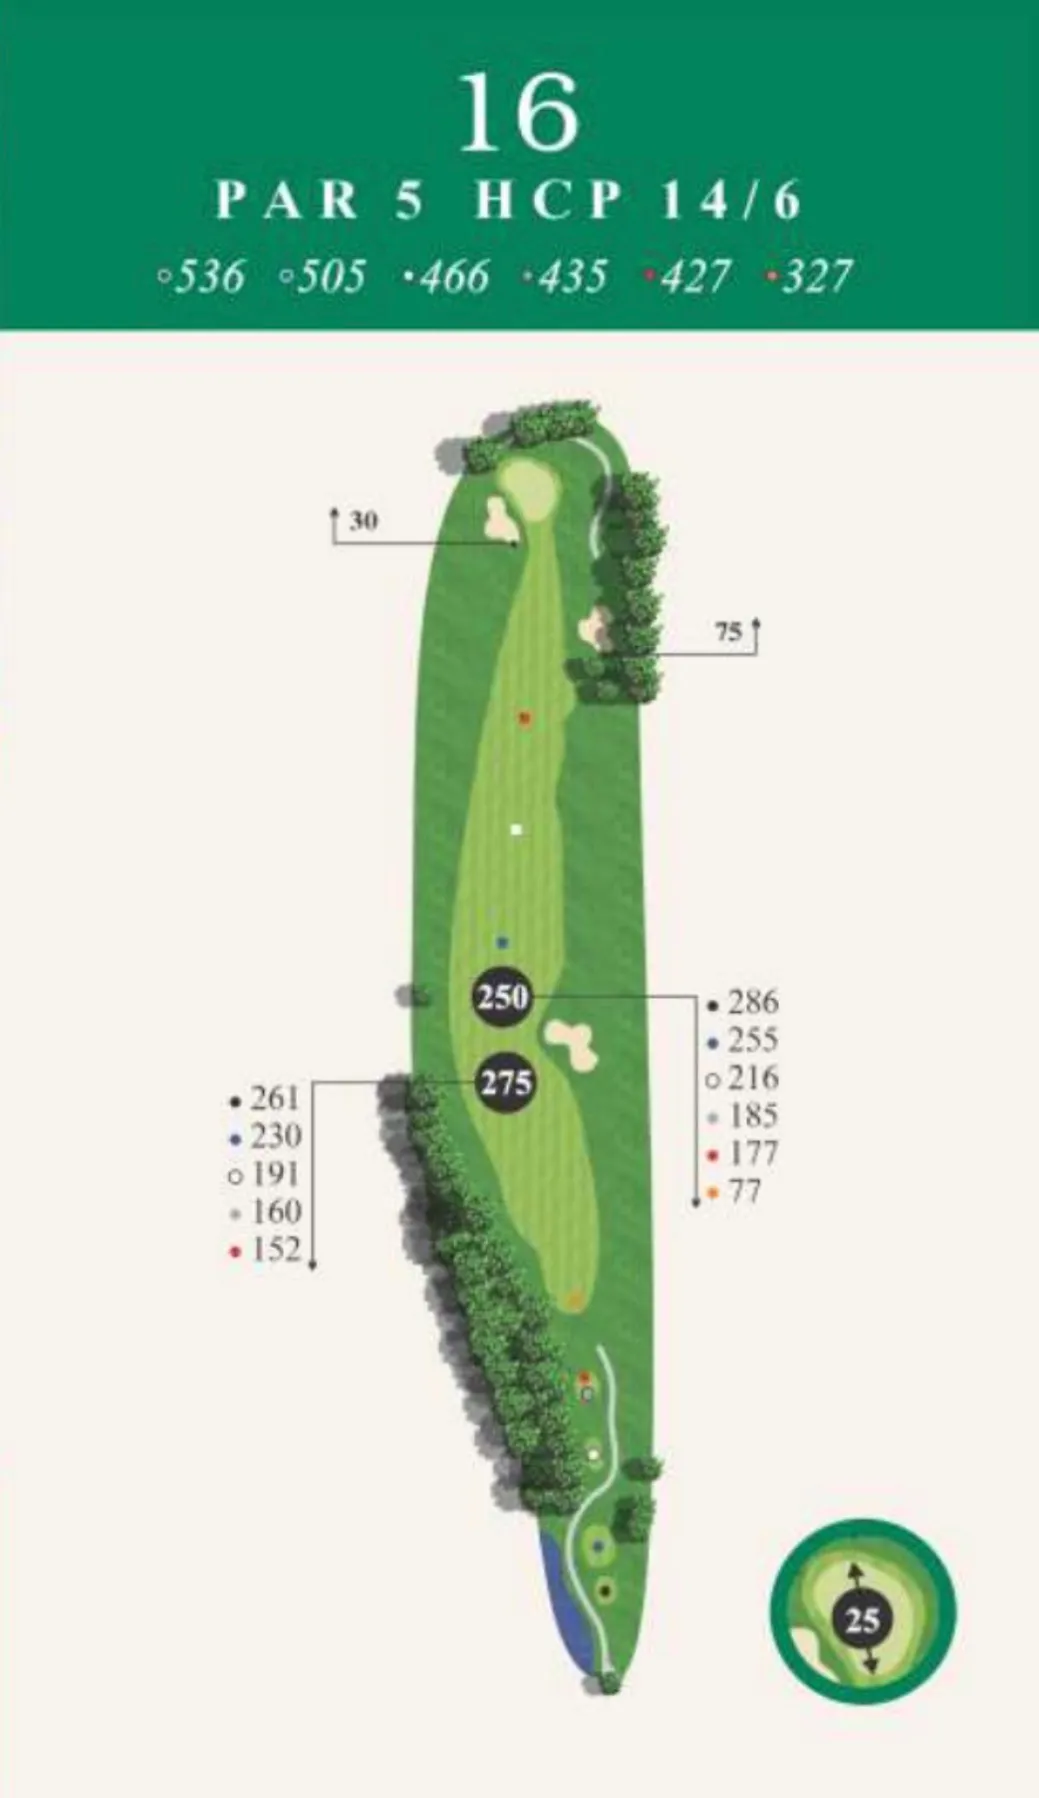
Hole 16 | Par 5
A generous driving hole with one of the widest fairways on the course invites players to swing freely. Avoid the fairway bunker on the right, then focus on a precise approach into a green protected by a front-left bunker.
Green Light: This is one of the better birdie opportunities on the course. Stay below the hole whenever possible, especially when the pin is tucked in the back.
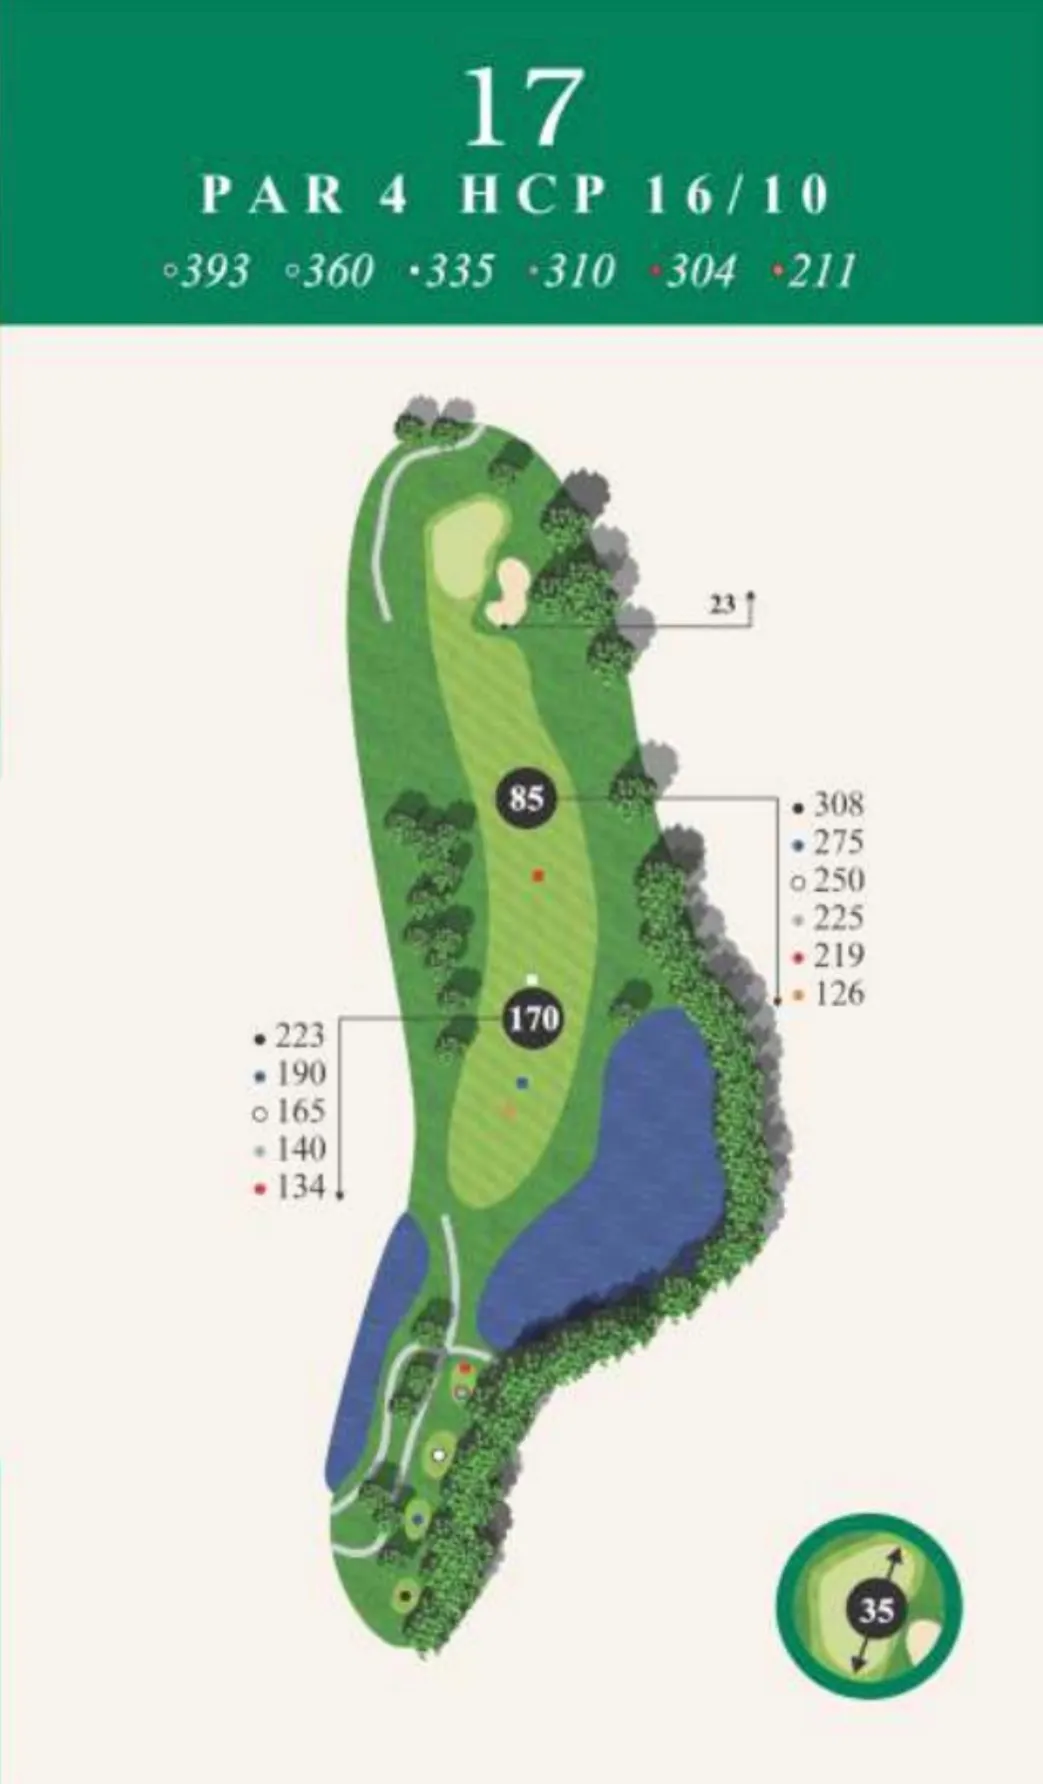
Hole 17 | Par 4
A shorter par 4 with a gentle dogleg left, this hole rewards patience and smart positioning. Water waits on the right while trees line the left. The long green slopes away from the fairway and is protected by a bunker on the right.
Stay Patient: Don’t let the yardage fool you. A controlled tee shot followed by a disciplined approach creates an excellent opportunity to score.
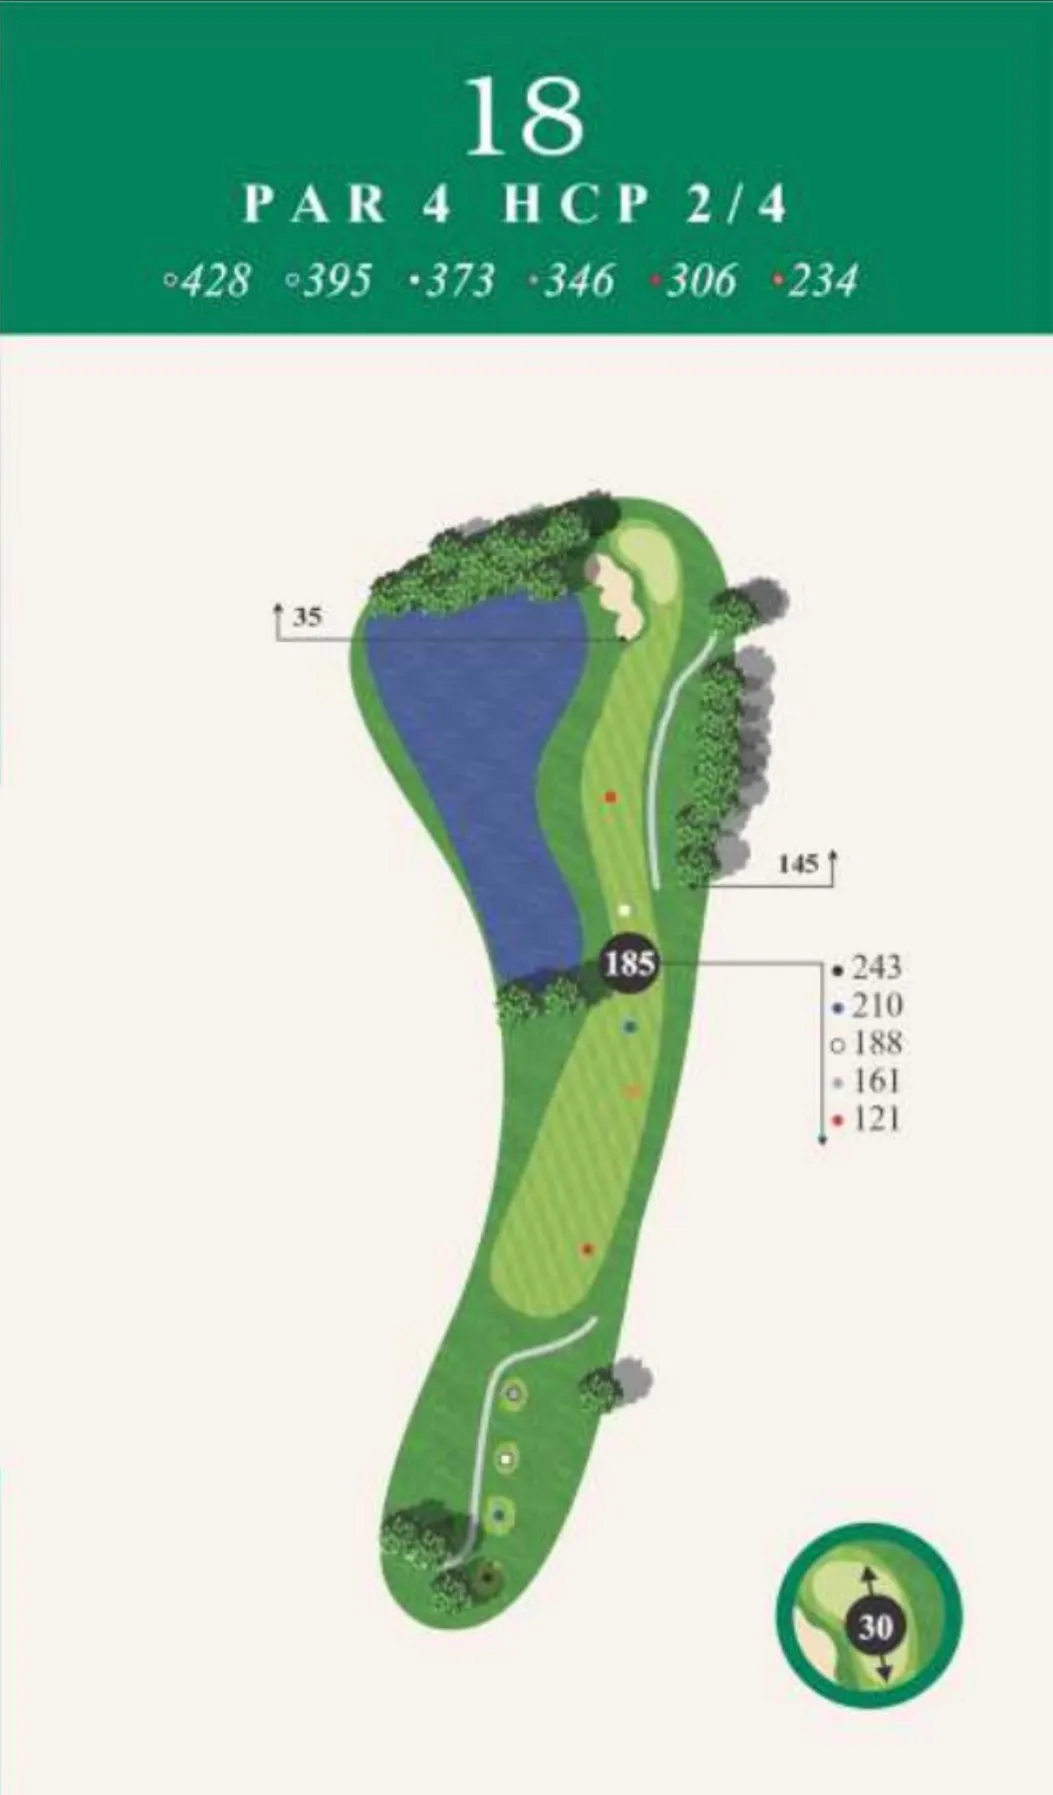
Hole 18 | Par 4
A strong finishing hole where one final committed swing can make all the difference. Four trees along the left mark the beginning of a water hazard that stretches to the green, while trees tighten the right side of the fairway near the 150-yard marker. Favor the right-center off the tee to set up the safest angle into the green, which is protected by a large bunker on the left.
Finish Strong: Many rounds unravel here. Stay patient, swing confidently, and remember that par is an outstanding way to close your round.